- Homeowners
- Professionals
- Products
- Back
- PlasterBoards
- Metal Framing & Accessories
- Jointing and Finishing
- Gypsum Plasters
- Ceiling Tiles
By material Type
By Category
- Resources
- About
- Careers
- FAQ's


Soundproofing Basics: 8 Reasons Why Sound May Be Leaking Between Adjacent Rooms
The ability of the human brain to tune out background noise and focus only on important sounds is truly remarkable. In fact, most of the time we don’t even notice how loud and noisy our background really is. Until of course, we have to work on an urgent task, or attend to an important call. In such situations, background noise can really play havoc with your focus and disrupt the task at hand.
In certain places, blocking out background sound becomes especially important, such as in classrooms and lecture halls, or in hospitals. Keeping the need for quiet in mind, these spaces are usually planned to be acoustically sound. However, you may observe that sound may be leaking through even after taking the necessary measures. In such cases, where the room geometry and design are taken care of, but sound is still permeating through adjacent rooms, here are a few reasons that may be behind it
1. Insufficient sound insulation
The first and foremost cause for sound leakage, of course, is thin walls. If the walls are not acoustically sound, they will not effectively insulate noise, which is why one should avoid thinner walls or materials with low sound insulation. Brick and block walls usually provide sound insulation around the range of 35dB to 38 dB (considering a 100 mm wall). On the other hand, gypsum-based drywalls provide a range of 40 to 60 dB depending upon configuration and thickness, with the right modifications, this number can go even further.

2. Incomplete height
Another reason for sound leaking through could be that the wall of the room is not taken up to the true ceiling but instead, ends at the false ceiling level itself. This leaves a gap between the true ceiling and the false ceiling, forming an unobstructed path for sound to travel. Since the defect will not be visible to residents, it can be hard to identify the root of the problem in such a case.

3. Cracked walls
As a building settles over time, it is not unusual for cracks to appear on the walls. These cracks are not only visually unappealing, they can also form a significant cause of sound leakage. Even small cracks, as thin as 0.2 mm, can reduce the sound insulation of a partition to up to 10 dB. As the size of the crack increases, the sound insulation will keep deteriorating.

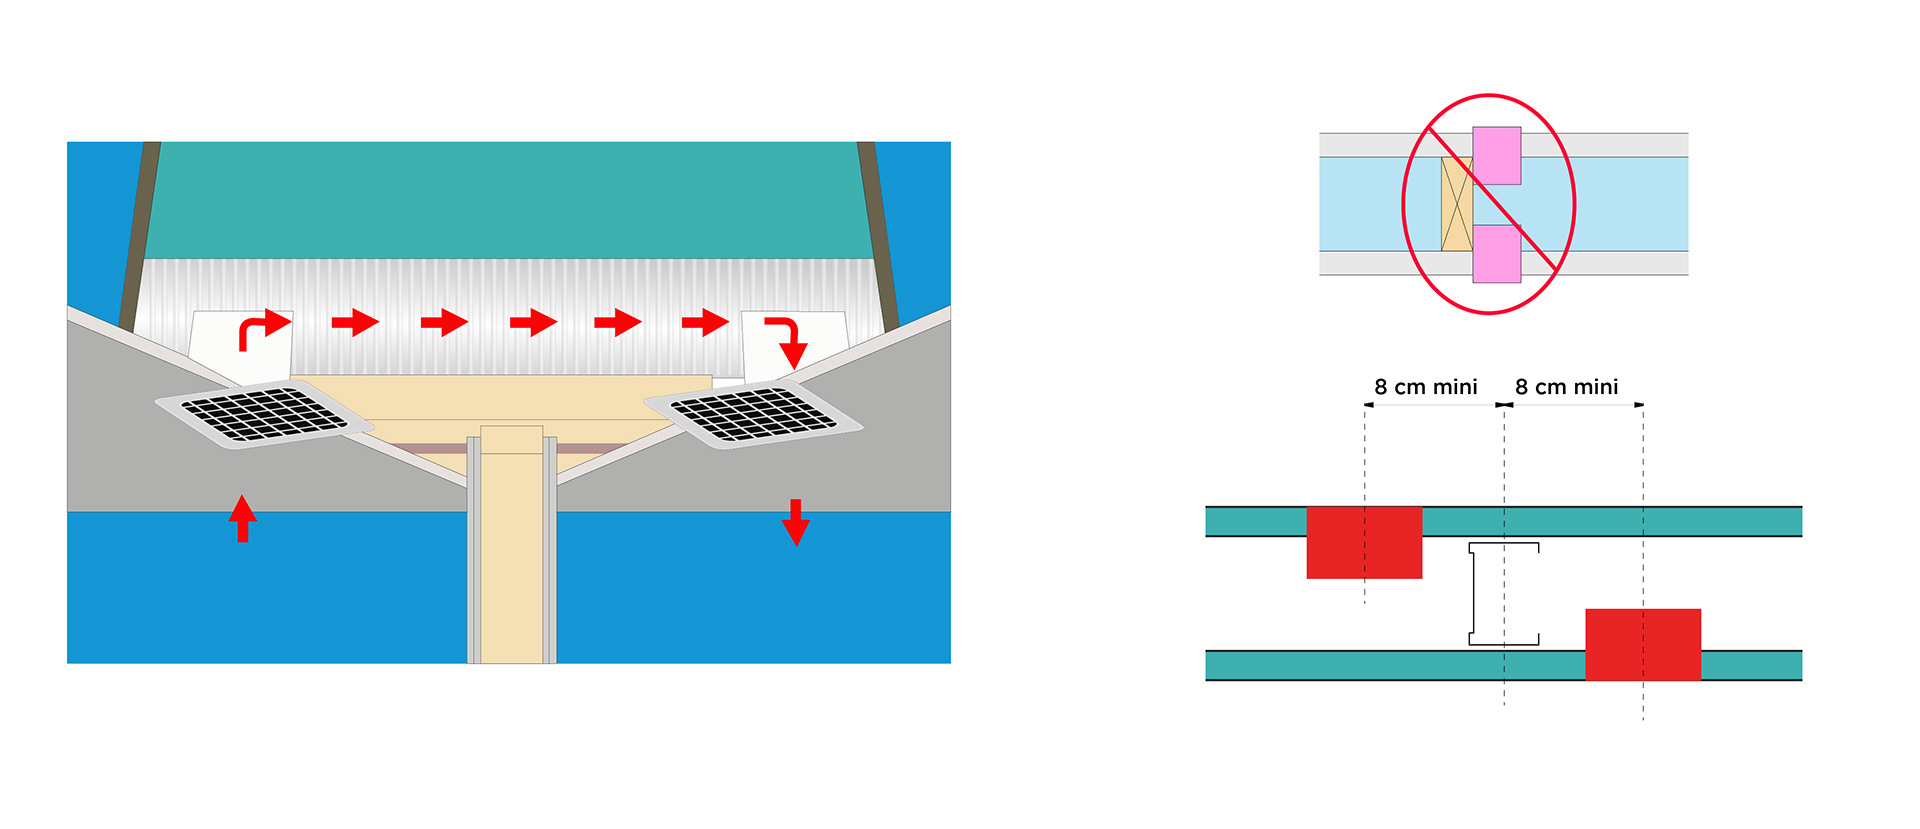
4. Common AC ducts
Usually, buildings are built in a way that adjacent rooms have common AC ducts passing through them. Since these ducts have an opening in both rooms, they can be a common medium of sound to travel from one room to the other.
One way to reduce the leakage of sound through AC ducts can be to keep the opening of the AC vent as far as possible from the common wall. Another option is to accommodate a zig-zag shaped path for the AC duct above the false ceiling. This increases the overall length of the duct, forcing any sound to die out before it can reach the other room, thus reducing inter-room disturbance.

5. Gaps along the edges
If there are gaps left between the walls or between the wall and ceiling in any room, sound may be permeating through these gaps. These are typically installation-related flaws that might have gone unnoticed during construction. Ideally, gaps should be avoided at the very nascent stage itself by adopting appropriate measures while installing the wall. However, if you do find gaps after the installation process, they can still be sealed, simply by using a suitable acoustic sealant.

6. Misshapen cut-outs
Usually, the area above the false ceiling is where most of the services are present, such as pipes, AC ducts, wires, etc. To allow these services to pass from one side of the wall to the other, the walls are usually punctured and cut to a suitable size. However, if these cut-outs are too large, the additional area cut out beyond the duct size becomes a leakage point. Hence, cut-outs should be fit to size, with just enough room for the pipes and ducts to pass through. The remaining area can be sealed by using appropriate sealants or other encasing materials as per the site’s requirement.

5. Back-to-back installations
Within the wall cavity, there are numerous services such as switch boxes, wiring and cables, or pipes and fittings. A lot of these services are metallic in material. For example, switch boxes are usually required on both sides of a common wall, to serve the requirements of both the rooms. When these switch boxes are installed back-to-back and their metallic surfaces touch each other, it creates a path for sound waves to travel through, from one room to other. This can be avoided by installing switch boxes in a staggered manner as shown below.

8. Combinational partitions
Sometimes, for aesthetic purposes, it is preferred to have a combination of gypsum-based drywall partitions and glass partitions combined. This gives an optimum blend of opacity and transparency, and uplifts the look and feel of the space. Although aesthetically it is a smart choice, it is imperative to seal the joints between these 2 different materials properly. Often, there are gaps observed between the two which turn into a major source of sound leakage.
So there you have it, keeping these pointers in mind is all you need to drastically reduce sound leakage and soundproof your space.
More Articles


Gyproc India Corporate Office
Saint-Gobain India Pvt Ltd - Gyproc Business,
Leela Business Park, 5th Level,
Opposite Leela Hotel, Andheri-Kurla Road,
Andheri (East), Mumbai - 400059,
Maharashtra, India
Saint-Gobain group
Saint-Gobain India Weber


© Saint Gobain India Pvt Ltd. All rights reserved